Have you ever stepped onto a cold concrete floor in the winter, wishing for a warmer, more comfortable space? I’ve been there—nothing beats the feeling of stepping onto a warm floor, especially when it’s freezing outside. That’s where hydronic concrete floor heating systems come in. I remember the first time I experienced radiant floor heating—it was a game-changer for me, and I knew it was something I wanted to share with others.
If you’re tired of dealing with cold floors, uneven heat, or high energy bills, this guide is for you. Hydronic floor heating isn’t just about warmth but creating a more comfortable, energy-efficient home. In this post, I’ll walk you through how these systems work, their benefits, and whether they’re the right choice for your space.
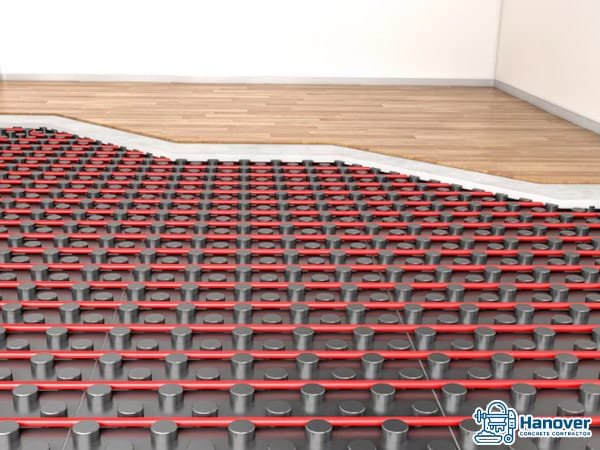
How Hydronic Heating Works Beneath Concrete Floors
Hydronic heating is a system that uses warm water flowing through pipes to heat a space. When this system is placed beneath your concrete floor, it creates a smooth, even heat distribution that radiates up, warming your entire room from the ground up. This type of heating is incredibly efficient and works silently, making it an excellent choice for any home.
Key Components of a Hydronic System
There are a few key components that make up a hydronic heating system. The first is the boiler or heat source, which heats the water to the desired temperature. Next, pipes—usually made of durable materials like PEX (cross-linked polyethene)—run beneath the concrete floor. These pipes carry the heated water throughout the system. Finally, the heat is regulated by a thermostat, ensuring your home stays at the perfect temperature without wasting energy.
These components work together to create a highly efficient and comfortable heating system that is both effective and reliable.
How Heat Transfers Through Concrete
So, how does the heat actually get to your feet? Heat naturally travels from warmer areas to cooler ones, so when the heated water flows through the pipes, it warms the surrounding concrete. The concrete, in turn, absorbs the heat and gradually releases it into the room. This is known as radiant heating, and it’s much more efficient than traditional heating systems because it directly heats objects and people in the room, not just the air.
The beauty of hydronic floor heating is that the concrete acts as a thermal mass, holding heat for extended periods. Even after the system has cycled off, the warmth radiates, keeping your space comfortable for longer without needing more energy. This process is what makes hydronic heating so effective and energy-efficient.
Benefits of Hydronic Concrete Floor Heating Systems
One of the main reasons hydronic concrete floor heating systems are becoming so popular is their impressive benefits. These systems offer more than just warmth—they also provide long-term savings and comfort that traditional heating methods can’t match. Let’s dive into some of the most significant advantages of choosing a hydronic heating system for your home.
Energy Efficiency and Cost Savings
Hydronic floor heating is incredibly energy-efficient. Unlike traditional heating systems, which rely on forced air that can escape through cracks in doors and windows, hydronic systems heat the space directly. This means less energy is wasted, and more goes toward warming the room.
Another reason for the energy efficiency is the low temperature at which the system operates. While radiators or forced air systems might need to reach higher temperatures to heat a room, hydronic systems work efficiently at lower temperatures, making them cheaper to run over time. You’re not constantly battling to heat air that escapes.
When you combine lower energy usage with the even heat distribution that hydronic systems provide, you’ll likely see a reduction in your energy bills. Although the upfront installation cost may be higher than traditional heating methods, the long-term savings in energy costs will make up for it in the coming years. Many homeowners even see a return on investment in just a few years.
Even Heat Distribution and Comfort
One of the best things about hydronic floor heating is the even heat distribution. Have you ever noticed how some areas of a room feel colder than others? Traditional heating systems, like radiators or forced air, can cause hot and cold spots. But with hydronic heating, the warmth rises evenly across the entire floor, giving you a consistent, comfortable temperature everywhere in the room.
This type of heat also feels more natural. Instead of the dry, hot air blowing from vents, the warmth from your floor feels gentle and enveloping, almost like the sun on your skin. It’s a comforting, soft heat that radiates upwards, keeping your entire space warm without needing constant adjustments to the thermostat.
Quiet Operation and Low Maintenance
Another significant advantage of hydronic floor heating is how quiet it is. Unlike traditional systems that can be noisy with blowing air or the clanking of radiators, hydronic systems operate almost silently. There’s no rattling, no fan noise—just quiet, steady warmth. If you enjoy a peaceful home or have sensitive hearing, this can make all the difference.
In terms of maintenance, hydronic systems are also incredibly low-maintenance. Once installed, these systems can last for decades with minimal care. As long as the pipes are properly installed and the system is set up correctly, you won’t have to worry about anything beyond occasional checks.
Unlike forced-air systems, which need regular filter changes and can accumulate dust and allergens, hydronic systems are much cleaner and easier to maintain over time. This makes them ideal for those who want comfort without constant upkeep.
Installation Process of Hydronic Heating in Concrete
Installing hydronic heating beneath concrete floors is a process, but it’s well worth the effort. Whether starting from scratch with a new build or renovating an existing space, the process has a few key steps to ensure everything runs smoothly. Let’s look at the best times to install this system and how the process works.
When to Install: New Builds vs Renovations
The ideal time to install a hydronic heating system is during the construction of a new home or when you’re pouring new concrete. In this scenario, the installation process is straightforward. After the concrete slab is poured, the pipes can be laid out before the concrete fully sets. It’s a seamless process, and the system will be integrated into the foundation and ready to go as soon as the house is completed.
However, consider installing hydronic heating in an existing home or during a renovation. In that case, it’s still possible but a bit more complex. In these cases, the system would typically be installed in a thin layer of concrete over the existing floor or under a finished floor, like hardwood or tile. The installation may require lifting up existing flooring to properly place the system, which could add time and cost to the project. However, with the right professionals handling the job, it can still be a successful and effective installation.
Steps Involved in Installing Hydronic Systems
Installing hydronic heating systems involves several essential steps to ensure everything works properly. While it may sound complex, it’s straightforward if done correctly. Here’s a general outline of what to expect during the installation:
- Planning and Design: The first step is designing the system to fit your space. This includes determining the pipes’ layout and calculating the heat required for each room. Proper planning is crucial to make sure the system provides even heat distribution.
- Preparing the Floor: For new builds, this involves preparing the concrete slab before it’s poured. The existing floor may need to be lifted for renovations, or a new layer of concrete might be applied.
- Installing the Piping: The pipes are carefully laid out in a grid pattern or loops once the floor is prepared. These pipes will carry the warm water beneath the floor. The pipes must be placed evenly and at the proper depth to ensure efficient heating.
- Connecting to the Heat Source: The pipes are then connected to the heat source, usually a boiler or water heater. This is where your system pulls hot water, travelling through the pipes to heat the floor.
- Testing the System: Before the floor is covered with concrete or flooring material, the system is tested to make sure the pipes are working correctly, with no leaks, and that the heat is being distributed evenly.
- Finishing the Floor: The floor is completed once the system is installed and tested. For new builds, this involves pouring the concrete slab. In contrast, renovations may include adding a layer of concrete or installing flooring materials like tile, hardwood, or carpet on top of the hydronic system.
Professional vs DIY Installation
Regarding hydronic heating installation, there’s a big difference between hiring a professional and attempting a DIY approach.
Professional Installation: Hiring an experienced heating contractor is the best route to ensure your system is installed correctly. They have the expertise to design the system for maximum efficiency and handle any technical aspects of the installation, such as pressure testing and integrating the system with your existing heating source. Professionals will also be familiar with local building codes and regulations, ensuring everything is up to standard. Although this option can be more expensive upfront, it offers peace of mind. It guarantees that your system will work as intended for years.
DIY Installation: While some homeowners may be tempted to install the system themselves, it’s a tricky process that requires both knowledge and experience. Installing hydronic systems involves working with plumbing, electrical, and concrete, which can overwhelm the average DIYer. Mistakes can lead to costly repairs or inefficiency down the line. If you’re up for the challenge and have the right skills, you can install a simpler system version. Still, being realistic about the time, cost, and potential issues is essential. Most people find that leaving it to the pros is the most efficient and cost-effective choice.
Cost Breakdown of Hydronic Concrete Floor Heating Systems
Like any home improvement project, installing a hydronic concrete floor heating system comes with its costs. However, the great thing about hydronic heating is that while the initial investment may seem higher than traditional systems, the long-term savings and comfort often make it a wise choice. Let’s break down what you can expect in terms of upfront and ongoing costs.
Upfront Installation Costs
The upfront cost of installing a hydronic concrete floor heating system can vary based on several factors, including the size of the heated area, the type of system you choose, and whether you’re installing it in a new build or an existing home. Generally speaking, you can expect to pay anywhere from $6 to $12 per square foot for installation. This includes the cost of the materials—like pipes, insulation, and the heat source—and labour.
The cost may be lower for new builds, as the system can be incorporated into the construction process. Additional work, such as lifting the floor or adding a new concrete slab, could increase the cost of renovations or retrofitting existing floors. While it’s a more significant investment upfront than traditional systems like forced air, hydronic systems offer higher comfort and efficiency in the long run.
Operating and Maintenance Costs
Once the system is installed, the operating costs are relatively low. Hydronic heating is energy-efficient because it operates at lower temperatures than conventional heating systems. Most homeowners report a noticeable reduction in heating costs after switching to hydronic systems, thanks to better heat retention and even distribution. Expect to spend about $1 to $2 per square foot annually on energy costs for heating, depending on how much you use the system.
In terms of maintenance, hydronic systems are relatively low-maintenance. Because the system is contained in the floor and doesn’t rely on moving air or complex components, there’s less wear and tear. Occasional checks to ensure the boiler and pipes are working well will help keep things running smoothly. If the system is installed correctly, maintenance is minimal—just some routine maintenance on the boiler and pressure testing every couple of years. This makes it a reliable and long-lasting solution, with few additional costs after the initial setup.
Long-Term Value and ROI
While the initial costs can be higher than other heating methods, hydronic floor heating offers excellent long-term value. Not only do you save on your monthly energy bills thanks to its energy-efficient design, but the system also increases the overall comfort of your home. And the best part? It adds value to your property. Many potential homebuyers consider radiant floor heating a luxury feature, which could make your home more appealing if you ever decide to sell.
Over the years, your investment in a hydronic system will likely pay off in energy savings, increased comfort, and a higher resale value. With proper care, these systems can last 20 to 30 years or even longer, providing consistent performance for decades.
Final Thoughts
Hydronic concrete floor heating systems offer an energy-efficient, comfortable, and long-lasting home heating solution. While the upfront cost may be higher than traditional systems, the benefits—including heat distribution, quiet operation, and low maintenance—make it a worthwhile investment. With the proper installation and care, you’ll enjoy consistent warmth, lower energy bills, and increased home value for years. If your hydronic floor heating might be the perfect fit if you are looking for an efficient, effective heating solution, hydrometry.
FAQs
1. How much does installing a hydronic concrete floor heating system cost?
The upfront cost typically ranges from $6 to $12 per square foot, depending on factors like system type, installation location, and whether it’s a new build or a renovation.
2. How energy-efficient are hydronic heating systems?
Hydronic systems are highly energy-efficient because they use lower operating temperatures and provide even heat distribution, reducing wasted energy. Most homeowners report significant savings on their energy bills over time.
3. Can I install hydronic floor heating in an existing home?
Yes, hydronic systems can be installed in existing homes, though it may be more complex than in new builds. Depending on your current setup, the process may involve lifting the floor or adding a layer of concrete.
4. How long does a hydronic heating system last?
With proper installation and minimal maintenance, a hydronic heating system can last 20 to 30 years or even longer, making it a reliable, long-term investment.
5. Is hydronic floor heating easy to maintain?
Yes, hydronic systems are relatively low-maintenance. Periodic boiler and pipe checks and regular pressure testing are typically needed to keep the system running smoothly.
6. Can hydronic floor heating be installed over existing concrete slabs?
Yes, it can be installed over existing concrete. However, the installation process might require additional steps, like adding a thin layer of concrete or flooring, depending on the system design.
7. Does hydronic heating work with all types of flooring?
Hydronic heating can be used under various flooring types, including tile, wood, and carpet. However, some materials, like tiles, are better at transferring heat, making them ideal for hydronic systems.


